Four Map Solver
9/29/2019
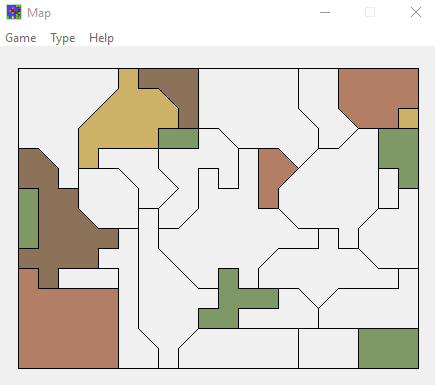
This script solves the "four color map" game on mobaxterm. I would play this
game every now and then and it was pretty difficult at times and I would often fail. I thought
it would be cool to make an auto-clicker that solves the game for you. I intially thought
of a vague plan. I guessed that Python would be a pretty good scripting language since I've
used it before for some basic excel automation. Also Python has been used by many people to
do some hacky stuff like this. I used Python 3 since Python 2 will become out-of-date on
January 2020. Which means no more additional features and no more security patches. Also, the
Python people have been telling everyone to stop using Python 2. If you use the latest Python 3
version, you may need to down-grade since many third-party libraries may not have caught up yet.
I had a basic outline of what I was going to do. I was going to do a prototype to get the
hard stuff out of the way. And then when that works, I'd work on the harder stuff. So intially
I had a very vague (but feasible sounding) plan. I was going to read a file of a graph
(TextReader.py), convert that to a graph, solve the graph (FourMapSolver.py), and then output a
text of that graph.
The solver uses basic recursion. I intially used brute force but then I had an insight.
I should note that if ONE random shape on the map is picked to be the first shape, and then you
try all solutions for the second, third, etc spot and a solution is not found, then you
will know that there is no point in trying another shape for the first spot. You can stop
processing right there since there is no viable color for the first spot. There has to be a
solution for any random first shape chosen.
Once that was completed, I moved to making an ImageReader. The ImageReader reads an image of the
actual inner-game and turns that into a graph and a grid of pixels linked to unique shape ids.
This piece replaced the TextReader.
Now for the next step. I was going to read the game from the screen and then output an image.
This is the ScreenReader.py. The ScreenReader finds the "Map" application, opens
it up, resizes it, and then moves it to (0, 0) in the upper-left corner. Moving it to the corner
makes it a little easier to work with since the win32gui library may give odd widths and heights
due to something with DPI scaling. I tried a bunch of solutions that I found on stack overflow
and found that they didn't work for me. Also, I should note that Windows 10 seems to have an
invisible border for 7 pixels to the left. This is all mildly annoying. The screen-reader then
tries to find the black inner-game border with a bunch of for-loops that move until it hit the
border. It is somewhat hacky. Then once it has the inner-border game coordinates, it gets the
image of the inner game area and passes it to the ImageReader and such...
That worked. Then instead of outputting an image, it was going to do the auto-clicking
(AutoClicker.py). It was a little tedious getting all of the correct information mashed up into
one class. All I had to do was order the computer to click and drag the colors to the shapes.
Using PyAutoGui was pretty easy since they have good documentation.
To top it all off, I put a bunch of comments and verbose documentation everywhere so people can
better understand the code and so that future-me doesn't come back and wonder what half of
arguments are supposed to be.
Github here